Welcome to QTE North America. Our website is being updated, therefore checkout is temporarily not available.
Please call us at 909-481-5115, or email us at info@Qtena.com to order or for more information.
GXL-24 PRO Owner's Manual
The GXL-24 PRO gold tester is a high-tech professional digital gold testing instrument. It was developed by Tri-Electronics for efficient, non-destructive determination of gold karat values from 6 to 24 karats. Use it for determining platinum and the gold karats in the 6-24 karat range (alloys commonly used in the jewelry industry). It is also able to distinguish gold plated and gold-filled items.
FEATURES
1. GXL-24 PRO display unit
2. Alpha-numeric display window
3. Selection buttons
4. Sensor outlet
5. Convert AC/DC outlet
6. ON / OFF Power switch
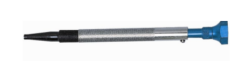
The Mechanical Sensor for the GXL-24 PRO Gold Tester consists of two parts:
(1) The sensor body
(2) A polyethylene plastic tube with pink gold tester gel
The gold tester gel tube must be placed inside of the sensor's body before beginning a test.
When using the Sensor be sure that:
1. The sensor nozzle contact and slots are clean. Use a cotton swab moistened with cleaner to clean the platinum contact and dry it before commencing tests. Clean after every 6-8 repetitive tests.
2. Dispense a small drop of gold tester gel before the start of each test
3. It is recommended that the sensor be thoroughly cleaned when the gel tube is changed or if gel is backing up around the plunger.
LOADING or CHANGING THE GOLD TESTER GEL TUBE
1. Remove the nose cone cap
2. Remove the Stationary Cap (light colored barrel) by turning it counter-clockwise. The stationary Cap and the Rotary Cap are not detachable.
3. Insert the Feed Screw Engagement into the appropriate slot of the Rotary Cap. Be sure that the Feed Screw is fully engaged.
4. Remove the cap from the tester gel tube
5. Insert the gel tube until it is fully lodged in the sensor, then turn the Stationary Cap (light colored barrel) clockwise until fully fastened.
6. Turn the dark colored top barrel counter-clockwise until the first drop of tester gel appears at the sensor nozzle (about 10-20 times to fill the cone).
NOTE: Do not turn the dark colored top barrel clockwise or it will damage the mechanism.
SENSOR PEN & GOLD TESTER GEL TUBE PROCEDURE
1. Load the gel tube into the sensor pen
2. Connect the long black wire to the sensor's plug outlet, the short black wire connector to the display unit, and the red wire to the testing plate
3. Turn the unit "ON". The unit should display "Clean sensor tip".
4. Before the start of testing, use the sensor nozzle cleaner or any small sharp instrument to remove dried or used gel from the dispenser opening and slots. Clean the sensor tip thoroughly with a cotton swab and alcohol, then dry the tip thoroughly.
5. Prepare the item for testing by thoroughly and vigorously cleaning a spot on the jewelry with the eraser provided. When testing 18k � 24k (750-999) gold, be sure that the eraser tip does not have a black deposit. Clean the eraser by rubbing on clean paper. Clean the area on the item to be clipped then clip the cleaned item.
6. The testing point on the object should be close to, BUT NOT TOUCHING, the alligator clip.
7. Holding the sensor on the vertical position with the nozzle down, twist the Rotary Cap counter clockwise, a click at a time, until a drop of testing gel appears on the tip. Wipe this first drop of gel on the towel and turn (usually one or two clicks) until a fresh drop appears. Use a minimum amount of gel for testing, especially for high karat gold tests 18k � 24k. After dispensing a small dome of gel on the sensor
tip wipe the tip on a piece of tissue paper by touching the tip to the tissue while holding the sensor in a vertical position to the paper. Do NOT use a dome of gel or an amount of gel that causes excess gel to appear along the edge of the sensor tip while testing. If there is not a enough gel the instrument will read "TRY AGAIN". It will not give an erroneous reading.
Do not let gel or sensor-nozzle touch the alligator clip!
8. Hold the sensor tip flat against the sample (perpendicular to the sample) and hold firmly in that position for approximately five seconds while the gold tester calculates and displays the gold value in karat and European standard.
|